Eyelash Extension
Must-read guides for lash mapping

Nov
It takes a lot of effort and experience to apply lash extensions. However, it also desires more than just skillful hands. Only a small mistake in choosing the length for lash extensions can lead to an unnatural appearance. Thanks to lash mapping, you are likely to decide how long lash extensions should be to put on which section of the lash line. Lashes mapping is a wonderful method to master if you’re new to this field.

1. What is lash mapping?
Before we go into specific guides for effective lash mapping, let’s figure out its definition and related aspects in eyelash extensions.
1.1. Definition of lash mapping?
People can consider lash mapping as the mathematics of separating the eye into distinct zones that determines the length of natural lashes required for each part. Furthermore, this method helps lash artists to design ideal lash extension planning for different preferences. Most of us are aware that two people do not have the same characteristics in their eyes. For this reason, every lash artist should be familiar with lash mapping and should do it on all of their customers from the outset to personalize lash extensions depending on the eyes.
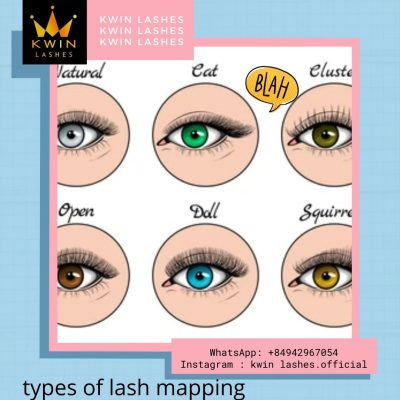
1.2. Types of lash mapping
Within the industry of lash extensions, we work with two primary forms of lash mapping. Let’s take a look at the following section to explore what they are.
- The first one is an abstract map called “Open Eye”. Lash artists will put the longest lash in the center, in line with the pupil. Gradually, the lengths will diminish as they reach the inner and outer corners. A dolly lash mapping is another style you may get with this kind of base.
- The second one is a “Feline” lash mapping, on which lash technicians get inspiration from Leonardo Di Vinci’s Golden Ratio for designing the eyelash extension plan. To make this type of mapping, you need to put the longest lash in the line from the outside of the nose to the iris and then to the brow’s kink. As a result, you can produce a wide range of looks, such as the Kitten lash map, Cat lash map, or even Squirrel lash map. All these types are impressive and outstanding.
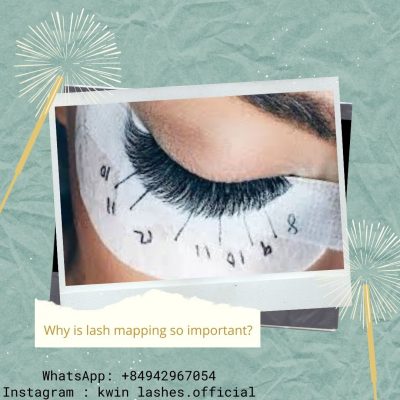
2. Why is lash mapping so important?
No matter how skilled or inexperienced you are in this field, having lash mapping before applying lash extensions is a requirement. It can benefit you in a variety of ways. Check out the following benefits of lash mapping to know its importance.
- To begin with, lash mapping allows you to produce a look that does not appear strange on the client. To do this, you must evaluate the client’s eye shape as well as the various characteristics of the eyelashes. Being sure that the lash extensions are suitable with the curvature, length, and thickness of the client’s natural lashes will make it seem more natural and less fake.
- The compatibility of lash extensions comes next. Lash mapping is essential for ensuring that the lash extensions do not make the customers feel overwhelmed. Creating a detailed map allows you to choose the appropriate thickness depending on the client’s natural lashes. It ensures that the style you designed is not too heavy or unpleasant to the client’s eyes.
- In the long run, developing unique eyelash styles for customers teaches you to experiment with diverse styles. It is beneficial to create one-of-a-kind and outstanding new lash styles on your own so that you may improve any sort of eye. Later on, you’ll be able to tell what’s correct and wrong straight away.
- Many lash artists fail to study lash mapping in-depth, resulting in the same lash style being applied to every customer that comes in. On the other hand, once you’ve mastered lash mapping, you’ll never do the same style twice.
3. Lash mapping for beginners
If you’re new to learning about eyelash extensions and don’t know where to begin since you’re still confused, read the section below to learn more about the instructions on lash mapping.
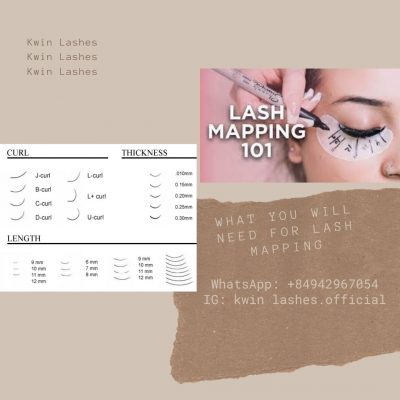
3.1. What you will need for lash mapping
Certainly, you will need to arm yourself with the proper tools to execute the method correctly. Here are the fundamentals you need for lash mapping preparation.
- A colored pen, especially a red one, but any color that contrasts with the lashes would do the mapping process perfectly. This will allow you to map the lashes more precisely. It is far preferable to use a high-quality pen that does not smudge easily. A good pen will facilitate a quick and correct lash mapping process.
- As a lash technician, you will do the task by using gel pads. The best quality gel pads are those which aren’t overly smooth or shiny, allowing you to effortlessly write on them. You will apply it directly beneath the bottom lashes.
- Having a wide range of eyelash extension lengths is great for lash mapping. Together with length variation, it is critical that you use high-quality lashes to ensure the greatest outcomes for your client. This is especially important as the quality of your lash extensions should be always a top priority.
- A lash chart is optional, but it may sound like a winner for you. This chart can be useful for both you and your client since it provides a better visual representation of how the lashes will appear.
Read more on:
- What Is the Difference between Classic, Volume, and Hybrid Lashes?
- How long do lash extensions last? Guide for beginners
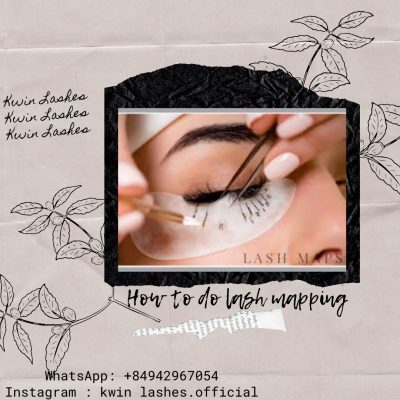
3.2. How to do lash mapping
Lash Mapping is a fantastic method since it helps you create a look that is entirely unique to your client. Let’s see how to map lash extensions.
- Mark the pupil on your client’s lid and transfer it higher to the brow so you don’t lose it when washing the lashes. This will prevent you from having to wake up your customer later to accomplish this.
- Prepare the client by putting on under-eye pads.
- Using the pupil dot, indicate the center of the under-eye pad where to put the longest lash.
- Divide the under-eye pad into pieces that progress to the inner corners and the outer ones.
- Separate a lash from the center part of the longest lash. Measure the length of an artificial lash, including no glue, from the natural lash root to its top until they have the same length.
- You now know that you may utilize lash extensions that are one-third longer. If your natural lash measures 9 mm, the longest lash extension you may apply is 12 mm. Take the lash extensions (12 mm) and measure them to determine whether they are the proper length.
- You now have your lash map’s midway length. In the center part, write this number (for example, 12 mm).
- Then please write the inside corner length. There is one thing you need to pay attention to is the golden rule of not using lashes longer than 8 mm as for the inside corners.
- Divide the length between the inner and center corners, and then do the same for the outside corners.
- Finally, remember to repeat these above steps on the opposite eye and this is the last step for lash mapping.
Kwin Lashes provides high-quality eyelash extensions with extended lash retention and a wide range of eyelash styles for diverse lash mapping. We are always confident in our capacity to provide our clients with the greatest products and services. What precisely are you waiting for? Take advantage of this golden opportunity to improve the look of your eyes. Contact us right away using the details provided below.
Kwin Lashes Contact:
“Ms. Wendy – Lash Expert
Instagram: kwinlashes.official”